The Ultimate Guide to Onigiri (Japanese Rice Balls) How to Make Onigiri
Discover everything you need to know about onigiri (Japanese rice balls)—from traditional fillings to step-by-step instructions on shaping, wrapping, and storing. Learn how to make delicious plant-based onigiri at home with this easy-to-follow guide!
The Ultimate Guide to Onigiri (Japanese Rice Balls)
Onigiri, or Japanese rice balls, are one of the most beloved and versatile foods in Japan. Whether tucked into a bento box, enjoyed as a quick snack, or wrapped up for a picnic, onigiri is a simple yet satisfying way to enjoy a perfectly packed bite on the go.
Unlike sushi, onigiri is not made with vinegar-dressed rice. Instead, it’s lightly salted and shaped into compact, handheld forms—most commonly triangles. They can be plain, mixed with seasonings, or stuffed with flavorful fillings like umeboshi (pickled plum), miso-marinated vegetables, or minced, seasoned tofu.
For me, making onigiri is one of the simplest ways to turn leftovers into something special. It’s so easy to transform last night’s teriyaki tofu, miso eggplant, or even a few spoonfuls of spicy carrot from sushi into a new, perfectly portable meal. While onigiri is often recognized as a humble, everyday food, I love dressing them up with a touch of luxury—maybe a spoonful of vegan caviar, a sprinkle of yuzu kosho (Japanese citrus flavored pepper), or a drizzle of truffle oil.
Jump to a section:
Whether you’re new to making onigiri or looking to perfect your technique, this guide will give you everything you need to make delicious, homemade onigiri with confidence!
Want more sushi tips and recipes?
Subscribe to Dear Sensei for weekly stories, recipes, and culinary insights, or check out my

About the Author
Marisa Baggett
Hi! I’m Marisa, a sushi chef, storyteller, and plant-based recipe creator. My passion is reimagining Japanese flavors through a plant-based lens while sharing the stories behind the food. Whether you’re here for a quick recipe or a deep dive into culinary creativity, I hope you leave inspired!
What Is Onigiri? A Staple of Japanese Cuisine
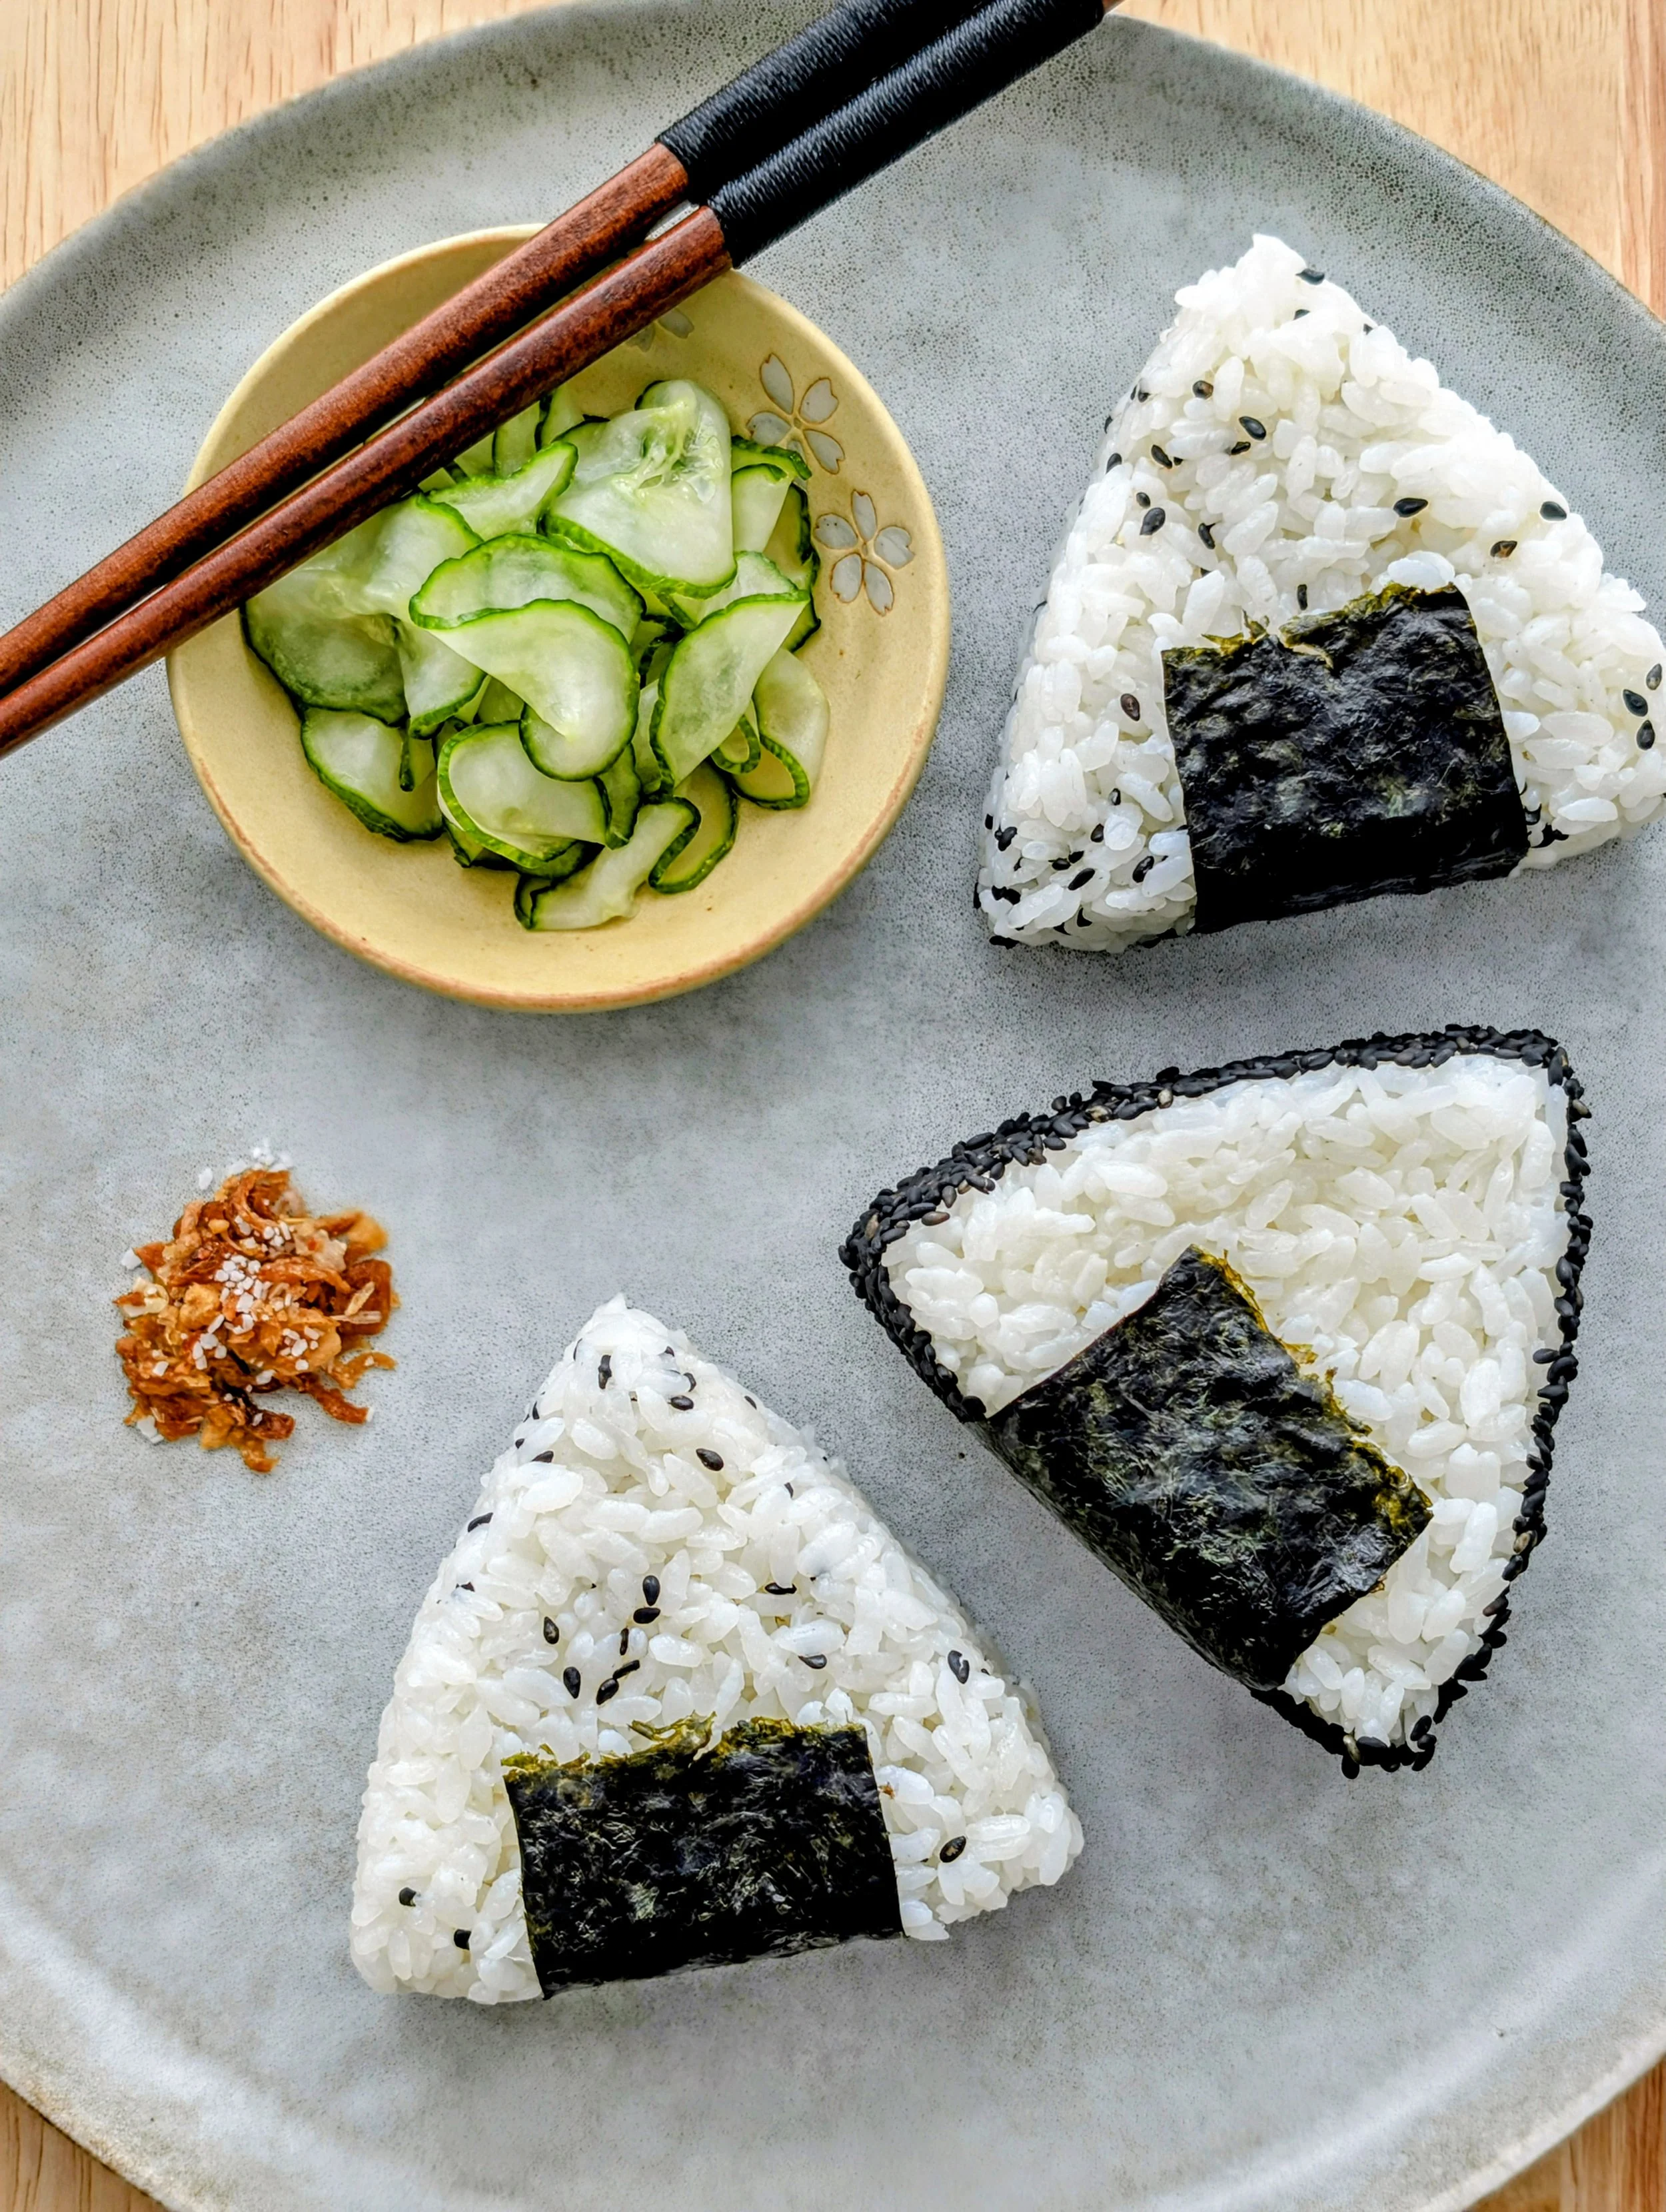
Onigiri, or Japanese rice balls, is a staple of Japanese cuisine. It’s a simple yet deeply comforting food made by shaping warm, salted rice into triangles, rounds, or cylinders—often wrapped in nori (seaweed) for easy handling.
While onigiri may look similar to sushi, the key difference is the rice. Sushi rice is seasoned with vinegar, sugar, and salt, whereas onigiri is simply salted. This subtle but important distinction gives onigiri a mild, delicate flavor that pairs beautifully with a variety of fillings.
Onigiri has been enjoyed in Japan for centuries, dating back to the Heian period (794-1185). Traditionally, it was a portable meal for travelers and samurai, offering a convenient way to carry rice without the need for chopsticks. Today, it remains a comfort food in Japanese households, convenience stores, and bento boxes—loved for its simplicity, versatility, and nostalgic appeal.
Umeboshi (Pickled Plum) – A tart and salty classic
Simmered Konbu (Sweet-Soy Braised Seaweed) – A savory and slightly sweet option, made with leftover konbu from making dashi
Miso Yaki Onigiri (Miso-Glazed Onigiri) – A flavorful, grilled or pan-seared variation where miso paste is brushed onto the rice before lightly toasting, creating a crispy, caramelized exterior.
Traditional onigiri flavors are a great starting point, but this humble dish is also a canvas for creativity—perfect for adding your own personal touch, whether with modern plant-based fillings or gourmet toppings that take it to the next level.
Two Types of Onigiri
Onigiri can be shaped in many ways, but the classic triangle is the most recognizable. They can also be formed into rounds, cylinders, or even more creative shapes. When it comes to preparation, onigiri can be made by shaping rice around a flavorful filling or by mixing ingredients directly into the rice before forming.
In this section, we’ll explore these two styles of onigiri, plus tips on how to shape them perfectly.
Mixed-Style Onigiri – Flavored Rice Balls
In mixed-style onigiri, the ingredients are mixed directly into the rice before shaping, creating a balanced, flavorful bite in every mouthful.
Why choose this style?
No filling needed—the flavor is evenly distributed throughout the rice
Great for meal prep—holds up well for packed lunches.
Visually appealing—colorful ingredients make it beautiful without extra garnish.
Filled-Style Onigiri – Rice Wrapped Around a Hidden Center
This is the most common type of onigiri, where the rice is shaped around a flavorful filling. The filling remains hidden inside until you take a bite, making it a delicious surprise!
Why Choose This Style?
Endless filling options—Perfect for both traditional and creative flavors.
Great for variety—You can make multiple flavors in one batch.
Can be coated or topped—Add sesame seeds, furikake, or a small dollop of filling for extra appeal.


How to Make Onigiri: Step-by-Step Guide
Making onigiri at home is simple and rewarding, but the key to perfect rice balls lies in the details. From choosing the right rice to shaping and wrapping techniques, this step-by-step guide will help you master the art of onigiri.
The Best Rice for Onigiri – Short-Grain is Key!
The right type of rice is essential for onigiri that hold their shape. You’ll want to select Japanese short-grain rice. It’s naturally sticky, allowing the rice to hold its shape without falling apart. Long-grain rice (like basmati or jasmine) don’t have enough starch and will crumble when shaped.
How to Cook Rice for Onigiri
Rinse the rice: Place the rice in a bowl and rinse under cold water, stirring gently with your hand. Drain and repeat 2-3 times until the water runs mostly clear—this removes excess starch and prevents the rice from becoming gummy.
Measure the water: Use the following amounts for perfectly cooked short-grain rice:
1 cup rice → 1 cup + 2 tablespoons water
2 cups rice → 2 cups + 4 tablespoons (¼ cup) water
3 cups rice → 3 cups + 6 tablespoons (~⅓ cup) water
Cook the rice:
Rice Cooker: Press start and let it cook according to the machine’s settings.
Stovetop: Bring to a boil, then reduce heat to low, cover, and cook for 15 minutes. Turn off the heat and let it steam for 10 minutes before opening the lid.
Fluff and cool: Gently fluff the rice with a rice paddle or fork, then let it cool slightly before shaping—warm rice is easiest to shape, but too hot will be difficult to handle.
How Much Rice Do You Need for Onigiri?
Each cup of uncooked short-grain rice yields about 2 ½ cups of cooked rice, which makes approximately:
1 cup uncooked rice → ~2 ½ cups cooked rice → 3–4 onigiri
2 cups uncooked rice → ~5 cups cooked rice → 7–8 onigiri
3 cups uncooked rice → ~7 ½ cups cooked rice → 11–12 onigiri
For hand-shaped onigiri, use about:
½ cup cooked rice for a small onigiri
⅔ cup cooked rice for a standard-sized onigiri
¾–1 cup cooked rice for a larger onigiri
Preparing the Onigiri
Before handling the rice, wet your hands by dipping them in a small bowl of water—this prevents sticking. Then, sprinkle a pinch of salt onto your palms to season the rice and add mild preservation.
For Mixed-Style Onigiri:
Add mix-ins (such as sesame seeds, furikake, or chopped vegetables) directly into the rice and mix well.
Scoop your portion (about ½ to ⅔ cup of rice) into your hands.
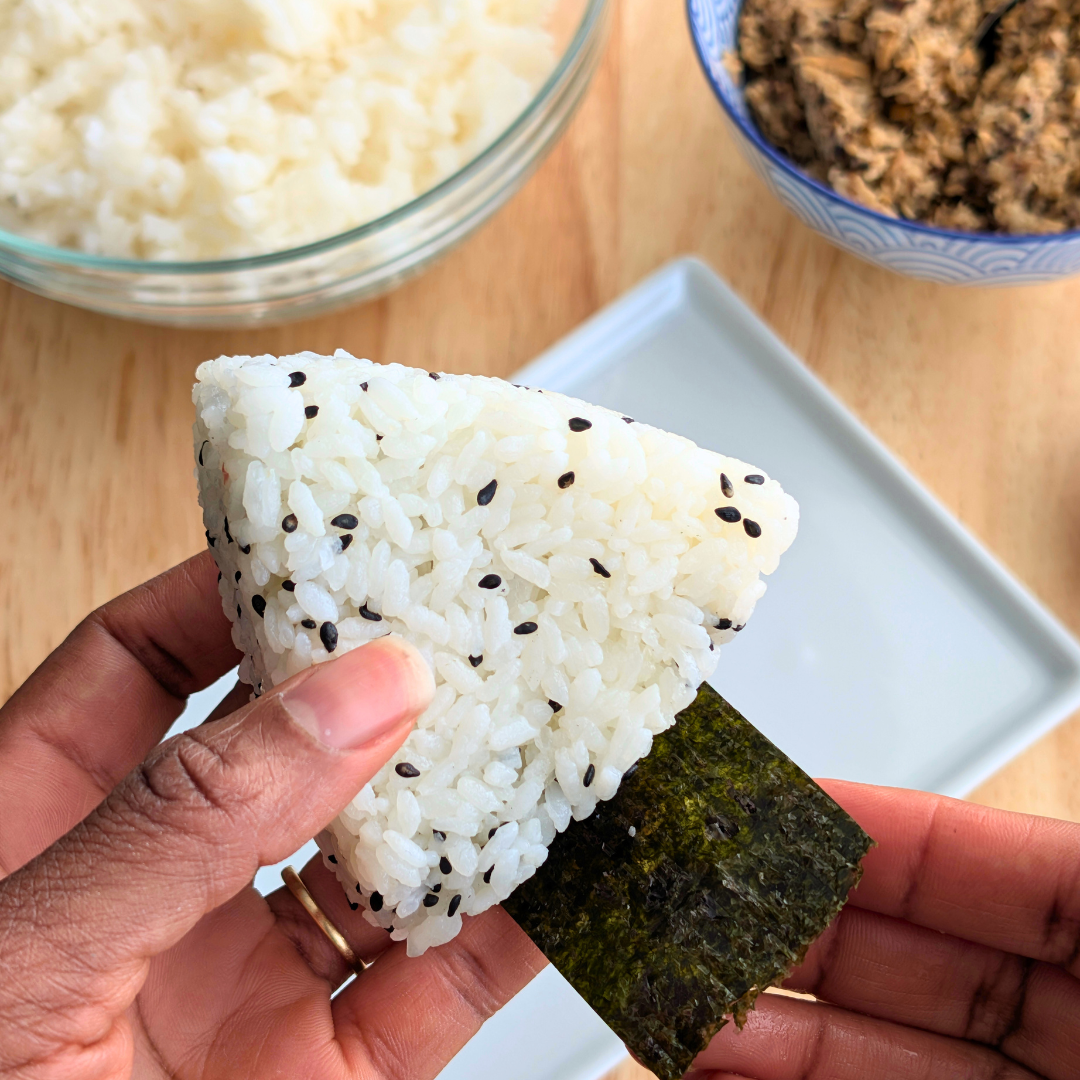
Gently press the rice into a triangle, round, or cylinder shape, pressing firmly enough to hold its form but not so hard that the rice becomes dense.
For Filled Onigiri:
Scoop a handful of rice (about ⅔ cup) into your wet, salted hands.
Make an indentation in the center and place about 1 teaspoon of filling inside.
Fold the rice over the filling, sealing it inside, then gently press into a triangle, round, or cylinder shape.
Press firmly but gently to ensure the onigiri holds together without becoming too compacted.
Alternatively, use plastic wrap or an onigiri mold for a mess-free shaping method!


Eco-Friendly Convenience Store-Style Wrapping
This method keeps the nori completely separate from the rice until just before eating, using waxed or parchment paper instead of plastic.
What You’ll Need:
1 sheet of nori (cut in half for a standard-sized onigiri)
1 sheet of waxed or parchment paper (cut slightly larger than nori)
A small strip of tape or sticker (optional)
Scissors (for cutting paper in half)
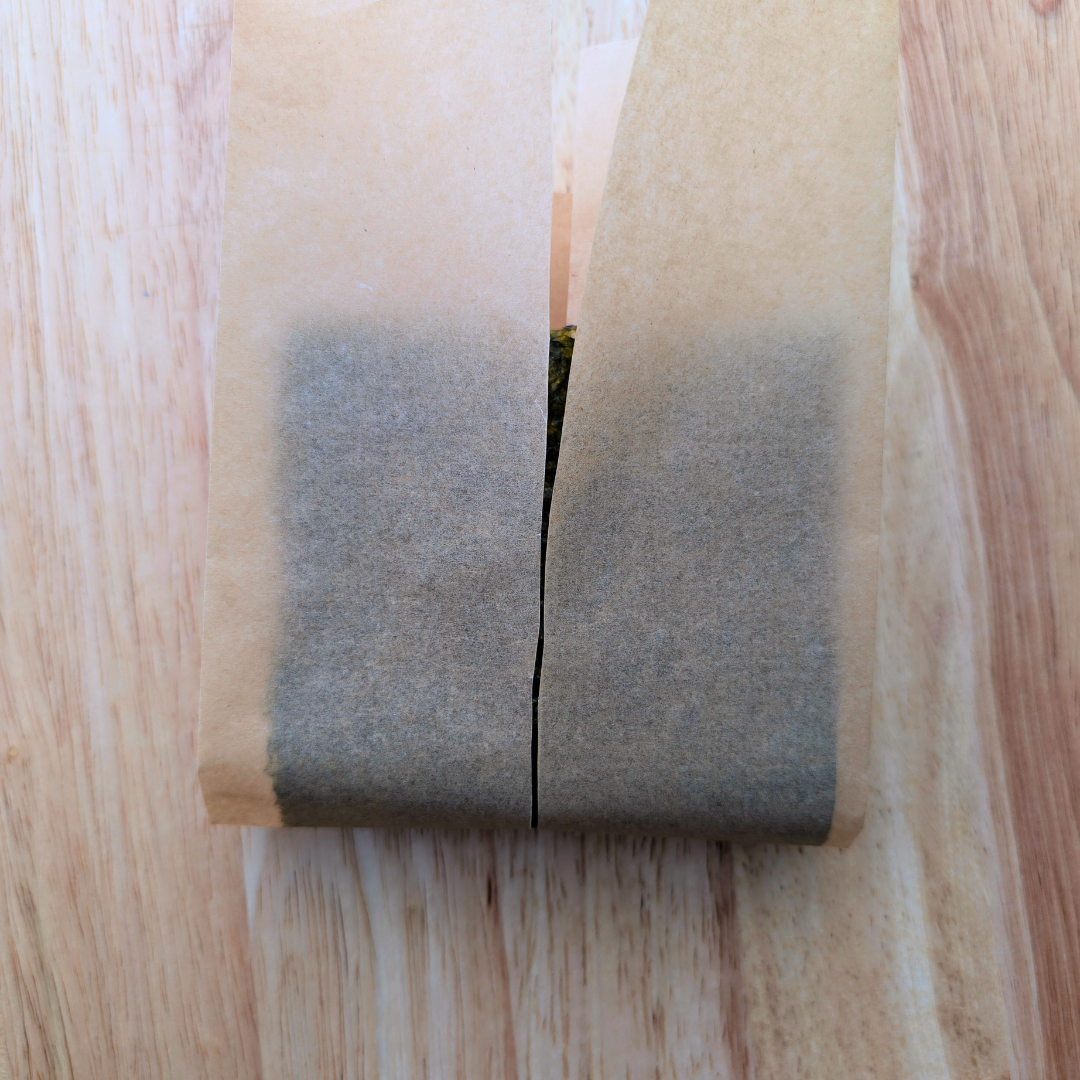
Step 1: Wrap the Nori in Waxed/Parchment Paper
Take your parchment or waxed paper and cut it in half vertically.
Push the two halves together so that the edges meet.
Place the nori (rough side facing down) in the center of the waxed paper.
Fold the vertical sides of the waxed paper toward the middle of the nori so the edges just touch—completely enclosing the nori inside the parchment/waxed paper.
Step 2: Place the Onigiri on Wrapped Nori
Place the onigiri directly on top of the wrapped nori, aligning the top corner of the onigiri with the top edge of the nori.
Step 3: Fold the Nori Around the Onigiri
Take the bottom half of the parchment/waxed paper and fold it up around the onigiri to meet the top edge.
Tuck the sides in around the onigiri, just like folding a gift wrap, so that it’s fully enclosed.
Step 4: Seal
Take the extra parchment/waxed paper and tape it around the bottom to close. Or twist at the top to create a neat seal at the top of the package.
Step 5: How to Eat It!
Remove tape or untwist the top of the parchment or waxed paper.
Tear along the center seam where the paper folds meet.
Peel away the waxed paper, allowing the nori to naturally wrap around the onigiri as you remove the paper.
Enjoy perfectly crisp, fresh nori!


Best Fillings & Mix-ins for Onigiri
One of the best things about onigiri is the endless variety of fillings and mix-ins! Whether you prefer traditional flavors, modern plant-based options, or gourmet twists, there’s an onigiri combination for everyone.
Classic Fillings (Timeless & Umami-Packed)
Umeboshi (Pickled Plum) – Tart, salty, and slightly sour with natural preservation properties.
Simmered Kombu (Sweet-Soy Braised Seaweed) – Deeply umami-rich with a satisfying chew.
Miso-Marinated Mushrooms or Tofu – A slightly sweet and savory filling with an earthy depth.
Creative Fillings (Bold & Modern Twists)
Take your onigiri to the next level with these exciting plant-based ideas:
Spicy Miso Chickpeas – Hearty and flavorful with a hint of heat.
Avocado & Furikake – Creamy avocado paired with crispy seaweed seasoning.
Roasted Sweet Potato & Black Sesame – Naturally sweet and nutty for a satisfying bite.
Kimchi & Scallion – A spicy, fermented filling with a punch of freshness.
Mix-Ins (Fold Into the Rice for Extra Flavor)
Mix-ins allow for flavor and texture in every bite without a central filling:
Chopped Shiso Leaves – Fresh, citrusy, and herbaceous.
Toasted Sesame Seeds – Nutty and aromatic.
Chopped Pickled Vegetables – A tangy, crunchy contrast.
Crispy Shallots or Garlic Chips – Adds a deep, caramelized flavor.
Crushed Nori or Furikake – Brings a salty, umami crunch.
Unexpected & Gourmet Mix-Ins (For Adventurous Palates)
Looking for something extra special? Try these unexpected flavor upgrades:
Truffle Salt & Garlic Chips – A luxurious umami-packed bite.
Vegan Caviar & Yuzu Kosho – A citrusy, spicy, and briny experience.
Crispy Tempura Bits – Adds a light, airy crunch.


Onigiri FAQs
Still have questions? Here are answers to some of the most common onigiri-related questions!
Are onigiri and nigiri the same thing?
While both are made with Japanese rice, nigiri is a type of sushi, while onigiri is a portable rice ball.
Nigiri consists of hand-formed sushi rice seasoned with vinegar, sugar, and salt, topped with fish or other ingredients.
Onigiri is made with lightly salted rice, often shaped into triangles or rounds, with fillings hidden inside for easy eating.
Onigiri is more compact and portable, making it a perfect grab-and-go snack, while nigiri is typically enjoyed fresh at sushi restaurants.
Can I use regular rice to make onigiri?
For best results, use short-grain Japanese rice, as it’s naturally sticky and holds its shape. Long-grain rice (like basmati or jasmine) won’t stick together properly.
How do I keep onigiri fresh for lunch?
Wrap onigiri in waxed or parchment paper, and if using nori, keep it separate until ready to eat to prevent sogginess. (Or try the convenience store wrapping method!)

Three Onigiri to Try!
Now that you know everything about onigiri, you're ready to make the perfect on-the-go treat! Whether you're craving something classic, bold, or unexpected, try one of these:

Join Dear Sensei for more delicious deep dives into Japanese inspired cuisine, sushi secrets, and the stories behind every bite.